Overview
In this tutorial, we’re going to show how Knot.x can be used to quickly transform your static website into a dynamic one. Instead of a manually coded HTML document presenting available books, we’re going to use an HTML template and populate it with data loaded from an external service.
This article concentrates on the steps required to integrate with a service using Knot.x, instead of client side JavaScript. In the next article we are going to compare that solution with a frontend integration.
What you’re going to learn:
- How to transform static HTML into dynamic content
- How to configure Knot.x to use simple REST services to get data
- How to use data from such services to dynamically populate HTML
If you want to skip the configuration part and simply run the demo, please checkout
Github/hello-rest-service and follow the README.md to see how to run it.
Book service – the service we’re going to integrate with
We’re going to use the Google Books API as a service feed with books. To make the tutorial easy to follow, we use a very simple endpoint that searches for all volumes for the given query.
The goal is to display all volumes related to java
(https://www.googleapis.com/books/v1/volumes?q=java).
A sample JSON response of the service looks like this:
{
  "kind":"books#volumes",
  "totalItems":605,
  "items":[
    {
      "kind":"books#volume",
      "id":"87totx4p3ZcC",
      "etag":"mviM5CD/Vg8",
      "selfLink":"https://www.googleapis.com/books/v1/volumes/87totx4p3ZcC",
      "volumeInfo":{
        "title":"Java in a Time of Revolution",
        "subtitle":"Occupation and Resistance, 1944-1946",
        "authors":[
          "Benedict Anderson"
        ],
        "publisher":"Equinox Publishing",
        "publishedDate":"2005-12-01",
        "description":"With remarkable scope and in scrupulous detail...",
        "pageCount":494,
        "imageLinks":{
          "smallThumbnail":"...",
           "thumbnail":"..."
         },
         "language":"en"
       }
    },
    ...
  ]
}
Our application
Knot.x has the ability to combine service data with HTML in a very efficient manner. It can get a JSON response from a service and then, using the Handlebars engine, render the dynamic part. This can be achieved without any custom code – it is only a matter of configuration.
The diagram below depicts how a request from a user is handled by the Knot.x application.
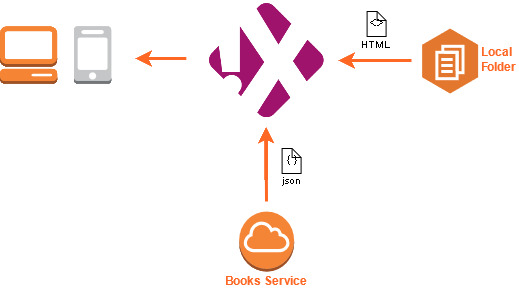
As soon as a request comes to Knot.x, it causes an HTML template to be fetched from the repository. In real cases, the repository is usually an external system, like a CMS, that is available over HTTP. However, for the purpose of demonstration, we simply get those HTML pages from the local filesystem using the Knot.x File system repository connector.
At this point, Knot.x detects all services required to render your dynamic page. Actual service endpoints are defined in Knot.x configuration, on the HTML level, each dynamic part simply specifies which endpoint it requires (by name). The unique set of services required, initiates process of querying services for the data, followed by an invocation of the Handlebars engine. The Handlebars engine combines the markup and the data obtained form the services to produce the final markup of the dynamic HTML snippet.
Finally, the rendered HTML is returned to the requesting user.
Start with Knot.x
Now it’s the time to prepare the environment required to run Knot.x. First, let’s download all required files from the Nexus repository and create the folder structure that we’re going to use in this tutorial.
Download the following files:
Additionally, download the file books.html from GitHub. We’re going to transform it into a dynamic one.
The directory tree should look like this:
├── knotx-config.json  (download from nexus knotx-standalone-1.2.0.json)
├── logback.xml (download from nexus knotx-standalone-1.2.0.logback.xml)
├── app
│   ├── knotx-standalone-1.2.0.fat.jar (download from nexus)
├── library
│   ├── html
│       ├── books.html (Taken from Knot.x tutorials Github)
To simplify Knot.x execution, create a run.sh script with the following content in the root folder:
#!/bin/bash
java -Dvertx.disableDnsResolver=true -Dlogback.configurationFile=logback.xml -cp "app/*" io.knotx.launcher.LogbackLauncher -conf knotx-config.json
You can try running Knot.x application with ./run.sh command. But for now stop it and follow next steps to configure it to do something useful.
More details about Knot.x deployment and setup can be found here.
Configure Knot.x
All the configurations used in this tutorial are available on Github/knotx-tutorials
As we already have a base Knot.x setup, let’s start adapting it to our needs.
If you open the knotx-config.json file in a text editor, you wil see that it contains an array
containing a list of modules. These are the Knot.x modules
that are going to be started.
{
  "modules":[
    "knotx:io.knotx.KnotxServer",
    "knotx:io.knotx.HttpRepositoryConnector",
    "knotx:io.knotx.FilesystemRepositoryConnector",
    "knotx:io.knotx.FragmentSplitter",
    "knotx:io.knotx.FragmentAssembler",
    "knotx:io.knotx.ServiceKnot",
    "knotx:io.knotx.ActionKnot",
    "knotx:io.knotx.HandlebarsKnot",
    "knotx:io.knotx.HttpServiceAdapter"
  ]
}
All of the above modules are explained on the project Wiki. In this tutorial, we’re going to pay attention to but a few of them.
In order to change the default configuration of any of the modules, you need to modify
this configuration JSON by adding a config JsonObject for the module(s) you want to modify, e.g.:
{
 "modules": [...],
 "config": {
   "knotx:io.knotx.KnotxServer": {
     "options": {
        "config": {
           ...
        }
      }
    }
  }
}
You can find more details on how to configure Knot.x on Wiki – How to Configure.
Repository configuration
As mentioned before, we are going to fetch an HTML template from our local file system.
Knot.x is shipped with a dedicated module called FileSystemRepositoryConnector designed
for this very purpose. You need set up the connector to use the /library folder from where requested HTML files
(containing Handlebars snippets) will be fetched.
{
  "modules": [...],
  "config": {
    "knotx:io.knotx.FilesystemRepositoryConnector": {
      "options": {
        "config": {
          "catalogue": "./library/"
        }
      }
    }
  }
}
Different repository connectors can be used at the same time, so we need to tell Knot.x which one should be used to process a given request. You can use regular expressions to match request URIs to different repositories.
Our template file (books.html) is available in the html folder, under the library root folder.
It means, that our target is that whenever a user performs a GET request for /html/books.html,
Knot.x should look for the /html/books.html file inside the /library folder on the local file system.
In order to achieve that, we need to tell KnotxServer module that:
Any request to
/html/.*should fetch a template from the file system repository.
{
  "modules":[...],
  "config": {
    "knotx:io.knotx.FilesystemRepositoryConnector": {...},
    "knotx:io.knotx.KnotxServer": {
      "options": {
        "config": {
          "defaultFlow": {
            "repositories": [
              {
                "path": "/html/.*",
                "address": "knotx.core.repository.filesystem"
              }
            ]
          }
        }
      }
    }
  }
}
You might notice the address field in the above configuration. This is the internal event bus
address of the Repository Connector, in this case it’s the address of our File System Repository Connector.
All configuration options and default values, such as address fields, for each Knot.x module are described in the documentation.
Book service configuration
The Service Knot module is responsible for an integration with
external services.
The configuration of this module consists of services which can be used in any template
processed by Knot.x. Each service has an associated name, that is actually being used on HTML
level and an address of the Adapter that is handling communication with the outside world.
This kind of mapping makes possible a quick substitution of the acutal service being used.
You can supply multiple Adapter modules for any kind of protocol or interface. And as long as
the data provided by your adapter implementation has the same structure, you can swap it for another implementation.
  "modules": [
    ...
  ],
  "config": {
    "knotx:io.knotx.KnotxServer": {
      ...
    },
    "knotx:io.knotx.FilesystemRepositoryConnector": {
      ...
    }
    "knotx:io.knotx.ServiceKnot": {
      "options": {
        "config": {
          "services": [
            {
              "name": "bookslist",
              "address": "knotx.adapter.service.http",
              "params": {
                "path": "/books/v1/volumes?q=java"
              }
            }
          ]
        }
      }
    }
  }
We’re saying here, that:
- One service will be used and its name is
bookslist - The adapter address for this name is
knotx.adapter.service.http - Each service request using this name will be done under the path
/books/v1/volumes?q=java
As you see we specified the URI but not the address of the service. The actual endpoint will be configured on the Adapter level. This configuration approach allows you to have two services defined, each using the same adapter (and therefore the same endpoint), but have a different name and path.
The adapter address points to the HttpServiceAdapter
that is available out of the box. So, as you can suspect, the remaining configuration
will happen in the Adapter module.
So let’s do this.
  "modules": [
    ...
  ],
  "config": {
    "knotx:io.knotx.KnotxServer": {
      ...
    },
    "knotx:io.knotx.FilesystemRepositoryConnector": {
      ...
    },
    "knotx:io.knotx.ServiceKnot": {
      ...
    },
    "knotx:io.knotx.HttpServiceAdapter": {
      "options": {
        "config": {
          "clientOptions": {
            "ssl": true
          },
          "services": [
            {
              "path": "/books.*",
              "domain": "www.googleapis.com",
              "port": 443
            }
          ]
        }
      }
    }
  }
We’re saying here that:
- The HTTP Client making calls to HTTP services should consider using SSL if necessary
- List of services to which we’re going to make calls, in our case there's just one
- If the service URI starts with
/books, e.g./books/v1/volumes?q=java - Then use
www.googleapis.com:443
- If the service URI starts with
At this point, we can say that Knot.x configuration is finished. You can download the final configuration file from here.
Template definition
Now it’s the time for the markup. You started with books.html having only static markup.
Now, you can modify it by removing book items and inserting a new dynamic snippet.
<script data-knotx-knots="services,handlebars"
data-knotx-service="bookslist"
type="text/knotx-snippet"></script>The most important elements of the above markup are:
data-knotx-service="bookslist"- defines that the service namedbookslistis required,_resultobject in Handlebars expressions is the root of data fetched from service,- the path to the object under
_resultis actually the path to an object in the JSON document returned by the servicehttps://www.googleapis.com/books/v1/volumes?q=java
Knot.x provides the extensible Handlebars mechanism that allows you to specify very lightweight templates by implementing your own custom Handlebars helpers.
The final HTML markup can be found here.
Run dynamic page
So, now it’s time to run our new, dynamic page. Just start Knot.x using the ./run.sh command
and go to http://localhost:8092/html/books.html in your favourite browser.