Overview
In this tutorial, we will explain more advanced possibilities of OpenAPI specification that Knot.x uses. We'll also demonstrate how to make use of the API visualization tool, Swagger UI, with Knot.x. It's a beginner-friendly tutorial, but you should go through the Getting Started tutorials first. For purposes of this article, it's assumed you have a basic project set up.
You'll learn how to:
- define more detailed APIs in OpenAPI standard
- visualize them with Swagger UI
OpenAPI
OpenAPI is a standard specification for describing REST APIs. It allows defining endpoints, parameters, data types, constraints and metadata. This format is also the integral part of Knot.x, so it's important to know it.
OpenAPI can be written either in JSON or YAML format. Knot.x prefers YAML, though. You have to specify your endpoints in knotx/conf/openapi.yaml file. Let's take a look at the default one (coming with the Starter Kit template). It starts like this:
openapi: "3.0.0"
info:
  version: 1.0.0
  title: Knot.x Starter Kit
  description: Knotx Starter Kit

servers:
  - url: https://{domain}:{port}
    description: The local API server
    variables:
      domain:
        default: localhost
        description: api domain
      port:
        enum:
          - '8092'
        default: '8092'
It defines the OpenAPI specification version used and some metadata about our API (version, title, description). Then it specifies a list of servers our API is available on. In this case, it's just one server: localhost:8092. Additionally, we provide some servers metadata such as descriptions.
We can also define some variables. They are not necessary in this case, but let's imagine that your API is available on 3 ports and 2 domains. Instead of listing all 6 possible combinations, you can just use variables. Also, note that all variables here have to be strings and that they don't have to just be port and domain. They can be anything.
Next in the file, there are paths defined. Let's see:
paths:
  /api/v1/example:
    get:
      operationId: example-api-with-handlers-operation
      responses:
        default:
          description: Example API response
  /api/v2/example:
    get:
      operationId: example-api-with-fragments-operation
      responses:
        default:
          description: Example API response
  /healthcheck:
    get:
      operationId: healthcheck-operation
      responses:
        '200':
          description: Everything is fine
        '204':
          description: No procedure are registered.
        '501':
          description: At least one procedure has reported a non-healthy stat
        '500':
          description: One procedure has thrown an error or has not reported a status in time
Endpoints are defined as a dictionary of paths. In this case, there are 3 of them: /api/v1/example, /api/v2/example/ and /healthcheck. The first two are very simple. Both specify only one HTTP method (GET). Those simple method definitions consist of operation and possible responses the endpoint may return. The /healthcheck path is similar but it lists multiple possible responses.
Note that there is nothing Knot.x specific in this file, it's all just the OpenAPI standard. Knot.x parses this file and assigns endpoints to appropriate operations. For example, /api/v2/example/ path will be assigned to the operation with id example-api-with-fragments-operation. Remember that operations are defined in /knotx/conf/routes/operations.conf file which is, indeed, specific to Knot.x.
If you try to call an undefined endpoint or use an undefined HTTP method (e.g. call /healthcheck with POST), Knot.x would automatically return 404 Not Found response. Otherwise, it will delegate the request to the assigned operation.
Implementing advanced OpenAPI concepts
Response body
Let's define some more advanced endpoints. First, we'll create /api/user endpoint that will return information about the logged-in user (note that we'll just mock the data for the sake of this tutorial). Add this to paths section of openapi.yaml:
/api/user:
  get:
    operationId: userinfo-operation
    summary: Returns basic info about a logged-in user
    responses:
      200:
        description: OK
        content:
          application/json:
            schema:
              type: object
              properties:
                id:
                  type: integer
                username:
                  type: string
We'll define operations later. What is new in this piece of code is the content part of the response. It's a dictionary of all possible bodies of the response. In this case, we say that the endpoint will always return a JSON in the form defined by a schema. Such a JSON would look like this:
{
  "id": 0,
  "username": "string"
}
We'll talk more about schemas later.
Reusing schemas
Let's say that we want multiple endpoints to return this kind of data. It would be nice to be able to reuse the same schema. We can do that in the components dictionary. Add it at the bottom of the file like this:
paths:
  //...

components:
  schemas:
    UserId:
      type: integer
      minimum: 1
    BasicUser:
      type: object
      properties:
        id:
          $ref: '#/components/schemas/UserId'
        username:
          type: string
        email:
          type: string
          example: test@test.test
        avatar:
          type: string
We've defined two types of data: UserId and BasicUser. UserId is just an integer. What's new here is the constraint minimum. This way we describe that this data is always greater than or equal to 1. There are many possible constraints we can define. You can read more about it in the OpenAPI documentation.
BasicUser is an object with id, username, email and avatar properties. Two things may need an explanation here. Firstly, in the id we used a $ref property. It allows us to reference other types (UserId in this case). Note that referencing already defined type is not the same as defining it "inline". The difference is basically like defining a class in Java versus using a Map. It'll become more clear later. At this point in the tutorial, you don't have to worry about it but keep it in the back of your head.
Secondly, we used an example property for the email. It's just metadata that can be used by visualization tools (more on that later).
Now, that we have our schemas defined in one place, we can reference them in our /api/user endpoint. While we're on it, let's also define a POST method for this endpoint. It should now look like this:
/api/user:
    get:
      operationId: userinfo-operation
      summary: Returns basic info about a logged in user
      responses:
        200:
          description: OK
          content:
            application/json:
              schema:
                $ref: '#/components/schemas/BasicUser'
    post:
      operationId: deprecated-userinfo-operation
      deprecated: true
      summary: Returns basic info about a logged in user
      responses:
        200:
          description: OK
          content:
            application/json:
              schema:
                $ref: '#/components/schemas/BasicUser'
Thanks to $ref properties, we didn't have to define the user twice. Note that the POST method behaves the same way as the GET method. It is, however, marked as deprecated. It's another piece of metadata that can be used by various tools.
Next, let's quickly define an endpoint that will return an array of users:
  /api/users:
    get:
      operationId: userlist-operation
      summary: Returns a list of users with basic info about each
      responses:
        200:
          description: OK
          content:
            application/json:
              schema:
                type: array
                items:
                  $ref: '#/components/schemas/BasicUser'
The thing to note here is that we define a custom array of the existing datatype. As you can see, the $ref property can be really powerful.
Request body
Let's move on to the usage of schemas to define request bodies:
/api/user/avatar:
  put:
    operationId: uploadavatar-operation
    summary: Uploads a new avatar for the logged in user
    requestBody:
      content:
        image/png:
          schema:
            type: string
            format: binary
    responses:
      200:
        description: uploaded
      400:
        description: bad request
  get:
    operationId: getavatar-operation
    summary: Gets a link to the user's avatar
    responses:
      200:
        description: OK
        content:
          application/json:
            schema:
              type: object
              properties:
                avatarUrl:
                  type: string
We define two methods for this path. The GET method is nothing special. We just define one possible response with an in-place defined schema. The PUT method has two possible responses without bodies and a request body of type image/png. It's defined in the same way as response bodies. A schema might even be shared between request and response bodies, if necessary.
One thing to note here is the schema type. It has a binary format. It's a special subtype of string commonly used for images. Another possible format would be base64. More on image uploading can be found in the OpenAPI documentation.
Parameters
Now, let's talk about parameters. Four types of parameters can be defined: query, path, header and cookie. Last two aren't covered in this tutorial, because they are analogical to query parameters.
Query parameters
Parameters can be defined like this:
/api/user/isadmin:
  get:
    operationId: admininfo-operation
    summary: Returns detailed information about user's account
    parameters:
      - in: query
        name: datatype
        description: mime-type that client want to be returned
        schema:
          type: string
          enum:
            - json
            - xml
        required: true
We define a list of parameters. In this case, we only have one. We specify its name, type (as query) and metadata (description). It uses a schema in the same way as request and response bodies do. The new thing here is the enum property. It specifies that this type can only have one of the specified values. Also, note the required: true part. It means the client can't omit this parameter. Therefore the only two correct requests are:
- /api/user/isadmin?datatype=json
- /api/user/isadmin?datatype=xml
If a client omits the datatype parameter or sets it as something other than json or xml, then Knot.x will automatically respond with 400 Bad Request.
Now, the api/user/isadmin endpoint definition is not correct. We have to define responses:
responses:
  200:
    description: OK
    content:
      application/json:
        schema:
          $ref: '#/components/schemas/IsAdmin'
      application/xml:
        schema:
          $ref: '#/components/schemas/IsAdmin'
  400:
    description: Bad request
In case of a success response, we defined two possible content types to be returned: json and xml. This demonstrates that schemas are abstract from any specific format and therefore, like here, can be reused between multiple content types. For JSON it'll be interpreted like this:
{
  "admin": true
}
And the same schema for XML will be interpreted like this:
<?xml version="1.0" encoding="UTF-8"?>
<IsAdmin>
    <admin>true</admin>
</IsAdmin>
Path parametrs
Path parameters are very similar. Actually, the only difference is that they are defined in the path itself (apart from standard parameters property). Let's add this path:
 /api/users/{id}/send/{message}:
    post:
      operationId: sendmsg-operation
      summary: Send a message to a specific user
      parameters:
        - in: path
          name: id
          description: ID of a user to send the message to
          required: true
          schema:
            $ref: '#/components/schemas/UserId'
        - in: path
          name: message
          description: message to be sent to the user
          required: true
          schema:
            type: string
            pattern: '^[a-zA-Z0-9_]*
      responses:
        200:
          description: OK
        400:
          description: Bad request
In the path, the parameters are defined using {} brackets. They are treated like wildcards, therefore our path will match all requests in the form of /api/users/.../send/.... Next, we define the same parameters in the parameters property, the same way as with query parameters. Note that the name in the parameter list must exactly match the name specified in the brackets. Also, path parameters have to be required.
We've also introduced a new schema constraint - pattern. It's just a regular expression that the parameter must match. If it doesn't, Knot.x will return 400 Bad Request response.
As already mentioned, we won't discuss header and cookie parameters, because they work the same way as query parameters. Just specify in: header or in: cookie.
Undefined operation
In the last path we'll define, let's use a non-existent operation. Knot.x will return 501 Not Implemented for this endpoint:
/api/future-feature:
  get:
    operationId: future-feature-operation # we won't implement this operation
    summary: This will be implemented in the future
    responses:
      501:
        description: Not implemeneted
As far as OpenAPI is concerned, there's nothing wrong or new in this path definition.
Implementing operations with mocked data
The endpoints we defined in the openapi.yaml file reference operations that they will invoke. Let's define the operations now. We'll use three custom handlers:
static-json- takes data from its configuration and returns it as JSONstatic-status- just returns a configured response codeadmin-info- returns harcoded data either as JSON or XML, depending on query parameter
Configuration
Define operations in the operations.conf as follows:
GET api/user/avatar returns JSON with an avatar link:
{
  operationId = getavatar-operation
  handlers = [
    {
      name = static-json
      config.json = {
        avatarUrl = ${mocked.loggedUser.avatar}
      }
    }
  ]
}
POST api/user/avatar always returns 200 OK:
{
  operationId = uploadavatar-operation
  handlers = [
    {
      name = static-status
      config.code = 200
    }
  ]
}
GET api/users returns JSON with the list of users
{
  operationId = userlist-operation
  handlers = [
    {
      name = static-json
      config.json = ${mocked.userList}
    }
  ]
}
GET api/user and POST api/user return data about one user
{
  operationId = userinfo-operation
  handlers = [
    {
      name = static-json
      config.json = ${mocked.loggedUser}
    }
  ]
}
{
  operationId = deprecated-userinfo-operation
  handlers = [
    {
      name = static-json
      config.json = ${mocked.loggedUser}
    }
  ]
}
GET api/user/isadmin invokes admin-info handler that returns harcoded data as either JSON or XML
{
  operationId = admininfo-operation
  handlers = ${config.server.handlers.common.request} [
    {
      name = admin-info
    }
  ]
}
POST /api/user/{id}/send/{message} always returns 200 OK
{
  operationId = sendmsg-operation
  handlers = [
    {
      name = static-status
      config.code = 200
    }
  ]
}
You've probably noticed our handlers' configurations reference an object called mocked. It's a HOCON syntax and we use it just so we don't need to copy and paste hardcoded user data. Let's add the object to the file:
routingOperations = ${routingOperations} [
  # ...
]

mocked = {
  loggedUser = {
    id = 1
    username = "UserNr1"
    email = "usernr1@test.test"
    avatar = "https://api.adorable.io/avatars/285/1"
  }
  userList = [
    ${mocked.loggedUser}
    {id = 2, username = "Lorem", email = "lorem@test.test", avatar = "https://api.adorable.io/avatars/285/2"}
    {id = 3, username = "Ipsum", email = "ipsum@test.test", avatar = "https://api.adorable.io/avatars/285/3"}
  ]
}
Java handlers
Now let's define three handlers we used above. They're really simple.
The static-status handler just returns a response with a given response code:
public class StaticStatusHandlerFactory implements RoutingHandlerFactory {

  @Override
  public String getName() {
    return "static-status";
  }

  @Override
  public Handler<RoutingContext> create(Vertx vertx, JsonObject config) {
    return routingContext -> routingContext
        .response()
        .setStatusCode(config.getInteger("code"))
        .end();
  }
}
Nothing to explain here. The static-json handlers just read its json property from the configuration, parses it to a JSON string and returns it:
public class StaticJsonHandlerFactory implements RoutingHandlerFactory {

  @Override
  public String getName() {
    return "static-json";
  }

  @Override
  public Handler<RoutingContext> create(Vertx vertx, JsonObject config) {
    return routingContext -> {
      Object json = config.getMap().get("json");
      routingContext.response().end(encodeJson(json));
    };
  }

  private String encodeJson(Object object) {
    if (object instanceof JsonObject) {
      return ((JsonObject) object).encode();
    } else if (object instanceof JsonArray) {
      return ((JsonArray) object).encode();
    } else {
      throw new IllegalStateException("Can't encode non-json object as JSON");
    }
  }
}
One thing that may look suspicious is the encodeJson method. It just calls the encode method on either JsonObject or JsonArray read from configuration. Its needed because, unfortunately, those classes don't share any interface with the encode method.
Last is the admin-info handler. It reads request query parameters and checks for the value of datatype param. It then returns hardcoded data in the form depending on its value:
public class AdminInfoHandlerFactory implements RoutingHandlerFactory {

  @Override
  public String getName() {
    return "admin-info";
  }

  @Override
  public Handler<RoutingContext> create(Vertx vertx, JsonObject config) {
    return routingContext -> {
      RequestContext requestContext = routingContext.get(RequestContext.KEY);
      ClientRequest clientRequest = requestContext.getRequestEvent().getClientRequest();

      String type = clientRequest.getParams().get("datatype");
      respondByType(routingContext.response(), type);
    };
  }

  private void respondByType(HttpServerResponse response, String type) {
    String contentType = "text/plain";
    String content = "";

    if ("json".equals(type)) {
      contentType = "application/json";
      content = "{\"admin\": false}";
    } else if ("xml".equals(type)) {
      contentType = "application/xml";
      content = "<?xml version=\"1.0\" encoding=\"UTF-8\"?><IsAdmin><admin>false</admin></IsAdmin>";
    }

    response
        .putHeader("Content-Type", contentType)
        .end(content);
  }
}
Note that our if..else statement doesn't have any case for when the parameter is neither json nor xml. That's because this handler won't even be called in such a case. Knot.x will return 400 Bad Request response, because of our schema in openapi.yaml.
While Knot.x validates requests based on OpenAPI schemas and handles incorrect cases, there is no such validation for responses. Handlers are responsible for delivering correct data and not breaking the contract.
Remember about adding our handlers to service loader in META-INF.
Swagger UI
Our application is basically working. If you run it should be able to call our endpoints. For example:
curl -X GET "http://localhost:8092/api/future-feature"Should return 501 because we didn't define any handlers for it. Or:
curl -X GET "http://localhost:8092/api/user/isadmin?datatype=xml"Should return an XML that looks like this:
<?xml version="1.0" encoding="UTF-8"?>
<IsAdmin>
  <admin>false</admin>
</IsAdmin>
However, we can use Swagger UI to make even better use of our openapi.yaml file. It's an interactive tool that lists all of our endpoints in a nice to look way and allows us to test them. It's a web application so we have to serve it on some endpoint. First, let's create an HTML file that will display Swagger UI. Note that it's recommended that you use non-standalone version if possible (or even a React component version, if your frontend uses React). It requires frontend build tools, though, so for simplicity, we'll use a standalone version hosted on unpkg.com.
Let's create resources/webroot/swagger/index.html file:
<!DOCTYPE html>
<html lang="en">
<head>
  <meta charset="UTF-8">
  <meta name="viewport" content="width=device-width, initial-scale=1.0">
  <meta http-equiv="X-UA-Compatible" content="ie=edge">
  <title>Swagger UI</title>

  <link rel="stylesheet" type="text/css" href="https://unpkg.com/swagger-ui-dist@3.24.0/swagger-ui.css">

  <script src="https://unpkg.com/swagger-ui-dist@3.24.0/swagger-ui-standalone-preset.js"></script>
  <script src="https://unpkg.com/swagger-ui-dist@3.24.0/swagger-ui-bundle.js"></script>
</head>
<body>
  <div id="swagger-ui" />
  <script>
    // initialize SwaggerUI on window load
    window.onload = () => {
      window.ui = SwaggerUIBundle({
        url: "/swagger/spec",
        dom_id: '#swagger-ui',
        deepLinking: true,
        presets: [
          SwaggerUIBundle.presets.apis,
          SwaggerUIBundle.SwaggerUIStandalonePreset
        ],
        plugins: [
          SwaggerUIBundle.plugins.DownloadUrl
        ]
      })
    }
  </script>
</body>
</html>
Most of the code here is a Swagger UI specific configuration needed for it to run. For more explanation check the Swagger UI docs. One important thing is the url: "/swagger/spec" part. It's an URL that Swagger UI will call to retrieve the OpenAPI specification file. We will expose the openapi.yaml file under this path.
Let's add two endpoints to the openapi.yaml file that will serve our index.html file and the openapi.yaml file itself:
/swagger/spec:
  get:
    operationId: openapi-operation
    responses:
      default:
        description: exposes openapi spec file to be consumed by swagger ui
/swagger/ui:
  get:
    operationId: swaggerui-operation
    responses:
      default:
        description: swagger-ui web app
And define the operations in operations.conf:
{
  operationId = openapi-operation
  handlers = [
    {
      name = static
      config.webroot = openapi.yaml
    }
  ]
}
{
  operationId = swaggerui-operation
  handlers = [
    {
      name = static
      config.webroot = webroot/swagger/
    }
  ]
}
The first operation serves the openapi.yaml file from as a static resource and the second operation serves the Swagger UI web app. Now we need to define static handler. It just serves static resources from a classpath:
public class StaticHandlerFactory implements RoutingHandlerFactory {

  @Override
  public String getName() {
    return "static";
  }

  @Override
  public Handler<RoutingContext> create(Vertx vertx, JsonObject config) {
    return StaticHandler.create(config.getString("webroot"));
  }
}
Remember about updating the META-INF.
Using Swagger UI
We're done. After you run the application you can go to http://localhost:8092/swagger/ui in your browser. It'll download the openapi.yaml file from the /swagger/spec path, parse it and display the graphical interface.
Top part should look like this:
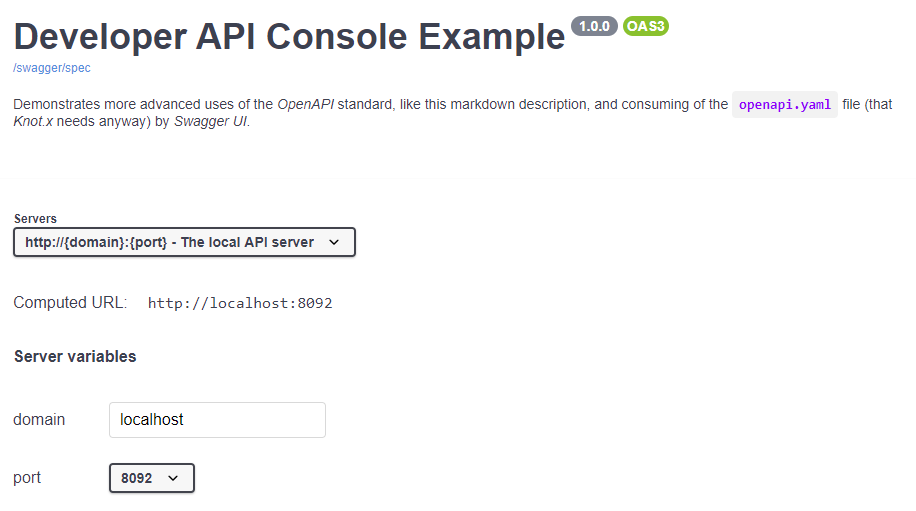
It shows some metadata we specified in the OpenAPI file. It also allows us to choose a server and its variables that we defined. It's used for testing the endpoints.
The next part shows the list of all endpoints and their methods:
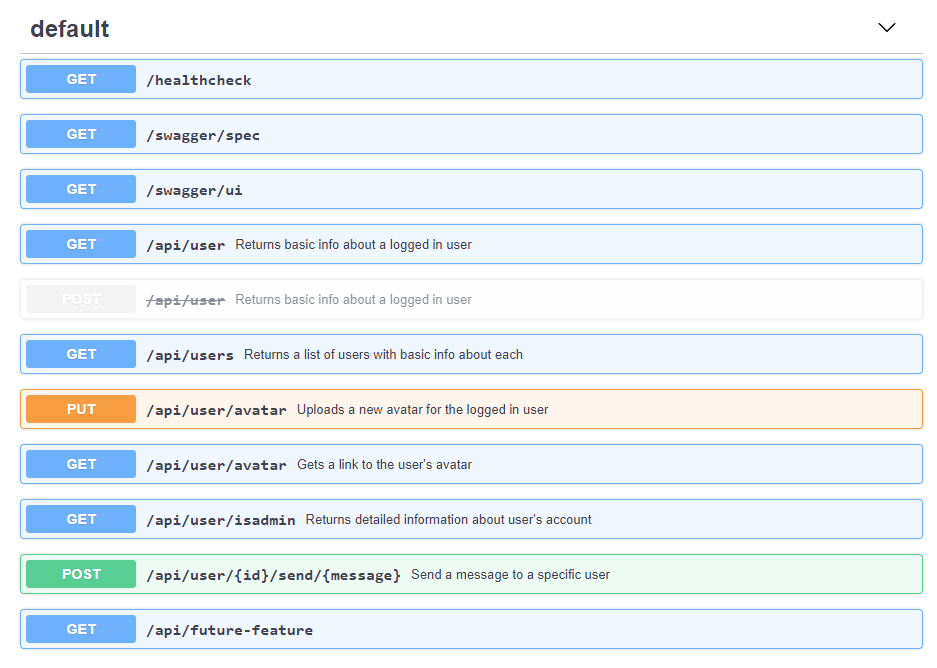
We can see summary is displayed here as well. We can also clearly see that POST /api/user is deprecated. Let's click on the GET /api/user/isadmin endpoint. You should see all the information about this endpoint. It consumes one required query parameter datatype that can either be json or xml. It can also return one of those two content types. Example responses are also provided. You can click on the Try it out button, specify the query parameter and Execute. Swagger UI will call this endpoint and show you the response. Curl commands are also provided. Swagger UI can handle many things, such as image uploading or even different types of authorization. You can read more about it here.
If you scroll down you'll see the Schemas section:
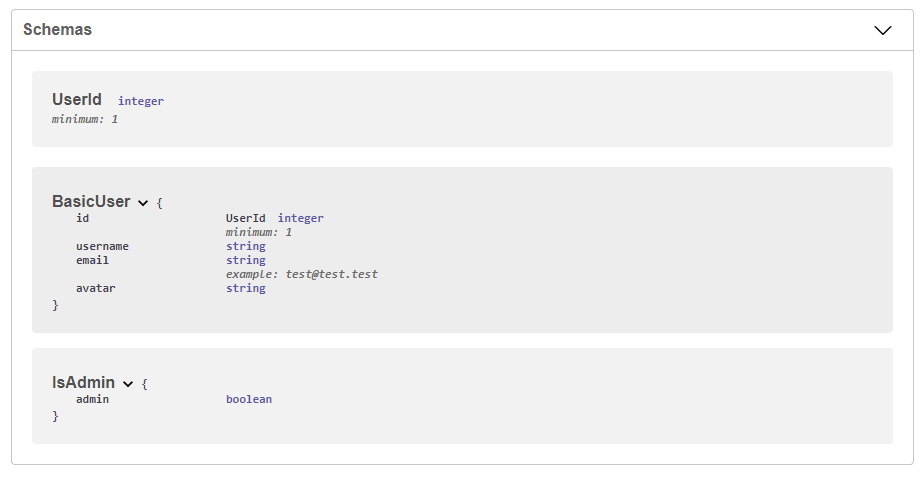
All schemas defined in components section can be viewed here. You cannot see schemas defined in an 'inline' way here. This is an important distinction.
Summing up
There are also other tools that can greatly improve your experience with OpenAPI (check out this list). Because Knot.x uses open standards you can easily transfer your knowledge between frameworks and make use of existing tools. In this tutorial we exposed our OpenAPI specification to be consumed by Swagger UI but, you could, for example, share it with your API clients or even get the specification file from someone you're constructing the API for. There exist tools that can generate code based on an OpenAPI file. Such things are not needed with Knot.x, because this standard is already a part of it.