Overview
In this tutorial, we will set up a simple project based on the Knot.x Starter Kit template, just as we did in the previous tutorial, but this time we will use Docker.
This is the second part of Getting started tutorials, and completion of Getting Started with Knot.x Stack tutorial is required to fully understand this tutorial.
What you’re going to learn:
- How to build a custom Docker image containing project-specific configs and extensions using Gradle
- How to validate the Docker image with functional / system tests
Prerequisites
You will need the following things to use Knot.x with Docker:
- JDK 8
- Docker
Docker
Open directory of the previous tutorial. If you don't have one, you can find it here.
Knot.x Starter Kit project builds either stack (zip distribution) or Docker image. In this tutorial, we'll use the latter.
The part responsible for building the Docker image is the docker.gradle.kts file, which uses the gradle-docker-plugin.
Let's rename the Docker image. Edit gradle.properties and change property docker.image.name:
docker.image.name=knotx-example/knotx-docker-tutorialBuild & Run
First, let's build your docker image:
$ gradlew clean build-dockerIf you take a closer look at build log (you can use -i flag for a more verbose process) you can see, that not only the project is being built, but also it:
- builds the Docker image
- starts a container for testing
- runs
healthchecktest on the container and then executes functional tests (more on that in the next section)
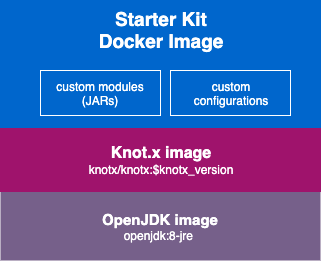
But what building the Docker image means in this case?

The diagram above describes how it works. Starter Kit Docker Image is based on Knot.x image hosted at Docker Hub, which is based on a base OpenJDK image. While building the image, we copy all custom modules (JARs) and configuration to the resulting image.
Now let's run the dockerized Knot.x instance:
$ docker run -p8092:8092 knotx-example/knotx-docker-tutorialFinal result
$ curl -X GET http://localhost:8092/api/hello
{"message":"Hello World From Knot.x!"}
Tests
Now let's take a closer look at what tests we have here.
The first test is the healthcheck. Technically speaking, this is not a test, but rather an endpoint in which, we call application's endpoints within the application. If the request succeeds, we can be sure that the Docker container is up and running.
Let's take a quick peek at docker/Dockerfile:
...

HEALTHCHECK --interval=5s --timeout=2s --retries=12 \
  CMD curl --silent --fail localhost:8092/healthcheck || exit 1

...
Docker is trying to reach localhost:8092/healthcheck with defined interval, timeouts and retries. If /healthcheck returns 200 code, we can be sure that the instance is up. For more details see this documentation.
A quick recap on how to find the class implementing the handler: in openapi.yaml endpoint /healthcheck is handled by operation healthcheck-operation, which has one handler registered with name healthcheck. This leads to the class HealthcheckHandlerFactory.java.
We'll modify it so that it will use the /api/hello endpoint.
Simply change the create method:
public Handler<RoutingContext> create(Vertx vertx, JsonObject config) {
    HealthChecks checks = HealthChecks.create(vertx);
    checks.register("API check", 200, future -> {
      WebClient webClient = WebClient.create(vertx);
      webClient.get(8092, "localhost", "/api/hello")
          .rxSend()
          .subscribe(onSuccess -> {
            JsonObject jsonResponse = onSuccess.bodyAsJsonObject();
            future.complete("Hello World From Knot.x!".equals(jsonResponse.getString("message")) ? Status.OK() : Status.KO());
          }, onError -> future
              .complete(Status.KO(new JsonObject().put("error", onError.getMessage()))));
});
Starter Kit has some example functional tests as well.
As this line suggests:
build.gradle.kts
sourceSets.named("test") {
    java.srcDir("functional/src/test/java")
}
They can be found under functional/src/test/java.
For now, we have one test that comes out of the box with the Starter Kit: ExampleApiITCase. Let's change it as well.
Again, we'll modify the test to use the /api/hello endpoint:
  @Test
  @DisplayName("Expect 200 status code from hello api.")
  void callHandlersApiEndpointAndExpectOK() {
    // @formatter:off
    given().
        port(8092).
      when().
        get("/api/hello").
      then()
        .assertThat().
        statusCode(200);
    // @formatter:on
  }
If you look closely at this file, you can see that task runFunctionalTests relies on Docker container to be up (which is ensured by healthcheck). Now that we have the application running, we can run integration tests by invoking various endpoints and asserting their responses. Here we use REST-assured for this purpose.
You can find full project implementation here.
